and the after...

I'm no guru on using flashes or gels or anything, but here is my understanding of the technique with materials. The CTO gel is a colored material that goes over your flash to bring a warming tone to your picture... to the area that is flashed. So the camera is set to a white balance of Tungsten. This produces the cold (blue) colors in the background (the non-flashed area). The subject is lit by flash with the warming filter. This compensates for the tungsten white balance and warms your subject to give that golden sunset appearance that is so warm and appealing.
Before I go on though, I must add that Dave Black does an incredible job (in my opinion) of this type of work with materials. He is a professional photographer that I really admire the work of and he explains his techniques on his website , if you are interested.
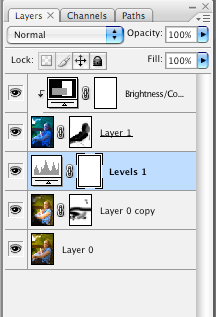
So to accomplish this in photoshop, here is my layers palette.

I first opened the image in Camera Raw. I simply set the white balance to Tungsten and opened a copy of the image in photoshop.
Secondly, I went back to Camera Raw and opened another copy set at "As Shot". I warmed it up a little with the Temperature slider.
I then placed both images on the same palette as layers (Layer 0 is the warmed image and Layer 1 is the Tungsten image)
Next, I masked Layer 1 to expose the warm layer below (using different brush opacities) - I focused on the skin tones and hair, leaving the clothing to the tungsten layer for added temperature contrast.
Then I copied Layer 0 to add some lighting effects to make it look like the flash was a little above and right of the camera (thus lighting Scotts face better) I masked that layer so that it looked like a more even light from my "flash"
I adjusted the opacity and levels of that Layer 0 copy.
I darkened my tungsten layer so that my subject stood out more.
and finally, I cloned some of the background (not shown on layers palette) to get rid of the blown out area.
No comments:
Post a Comment